Showing posts with label renaissance. Show all posts

Sunday, October 23, 2016

Elizabethan Hat and Mask Shenanigans

At the end of summer my other fun project outside of work was creating an Elizabethan men's hat for my partner, who was working on his own full English Renaissance ensemble.  It is a very similar style to my own 1560's hat (that goes with the turquoise dress) but constructed AFTER I spend a few months as a milliner's apprentice at the Lynne Mackey Studio.  In other words, it is MUCH better and more professionally constructed.  

Elizabethan bonnet of red silk & wool blend, bound in navy with an underbrim of ultramarine silk.  Pheasant and ostrich feather plumes, pewter medallion, metallic trim over grosgrain for the hat band.  The brim has an under structure of lightweight pellon, wired with millinery wire and mulled with a single layer of canvas. 

  
Barrettes make a pretty good substitute for alligator clips. Score!
 
The finished product!  No model photos yet, as the rest of the project is still catching up.  We all know that the hat makes the man, anyways.
I delivered the hat in person to the New York Renaissance Faire, and took the opportunity (or maybe used to the excuse to avoid packing for my move...) to make a masquerade mask to match my copper Italian ensemble.  I also dressed my sister up in the Lettice Knollys gown, and we had a grand time as patrons, socializing and hitting the pubs. 
 
Of course, I wore the hat myself for as long as I could get away with.
 
Here you can sort of see my mask, which I was quite proud of but nonetheless completely neglected to photograph.  Maybe later!

Speaking of masks, my image and work were  used on the poster for Masquerade Weekend at The New York Renaissance Faire for the 2016 season.  So even though I was living the southern dream in North Carolina, some piece of me was still present in New York.


Tuesday, August 18, 2015

Making My Elizabethan Hat, and Other Details

Hello world!

I didn't post much during the end of my project because things got pretty minute and self-explanatory: putting hooks and eyes onto my bodice, trimming my skirt, adding buttons, etc.  the new elements are the shoulder poofs, forepart, sleeves and hat.

The shoulder poofs are crescent-shaped pieces of green silk flat lined with tulle net, then gathered onto a smaller crescent to create a 3 dimensional croissant shape.   I applied these to the shoulder straps with a slip stitch, then strung beads over the top in an offset pattern to mimic spiraling.  The beads are on button thread which is tacked to either side of the shoulder strap.

My sleeves are basic fitted 2-part sleeves of quilted silk that came with white beads at the intersections.  I sewed up the back seam completely but only did 1.5 inches at the top of the front seam, then finished the open edges and sleeve cap with piping.  I sandwiched elastic button loops between the piping and the edge, then lined the sleeves with pale green silk to match my poofs.  They have eyelets along the sleeve cap to lace into my bodice.

Now for the fun part: making a hat!

I started out by tracing a crown-rise that is smaller than my head- the rise is 21 3/4" and my head is 22 3/8".  This ensured that the hat would perch on my head, rather than coming down to my ears.  I added 2" to that shape to create the brim pattern, plus a 1" seam allowance inside the traced circle.  I cut that shape 2x out of heavy-weight craft pellon (which is better for outdoor summer wear than buckram, which wilts with sweat and rain).  I pad-stitched the two layers of pellon together and then added millinery wire to the outside edge with a classic buttonhole stitch.  At this point, my friends and loved ones were calling it my "toilet seat hat." 

Next I cut the same shape, plus 1/2" seam allowance on the outside edge, out of my light green silk, which will cover the top of the brim. 

And I cut the same shape once again (this time without seam allowance) out of gold silk, which will be the underside of my brim.  For optimum wrinkle-free tension, I kept it as a full oval and didn't trim out the inside.   I smoothed the silk over the pellon and pinned it, then sewed just inside the outside edge and 1" inside the ring, securing the gold to the pellon. 

You can see my crown-rise (on the left) and my paper pattern (on the right) here.  Next I added piping, made of bias strips from the gown fabric, to the outer edge of the brim cover. 


Now I stretched the cover over the base, and machine stitched it down on the inside, along the stitch line (the line which will eventually sit against my head.  Trimmed out the extra gold fabric with an X-acto knife, then I smoothed everything out and turned the piping seam allowance under and down, covering all the raw edges. 


Better view of the bottom of the brim, with the piping partially stitched down.  

Once everything was attached, I clipped the seam allowance and creased it up

I cut a support band out of one layer of the same pellon, and stab stitched the brim SA to the band.

For the crown, I cut once circle of silk the same size as the hat brim (without cutting out the center oval, of course), and two of tulle netting.  I zigged those three layers together, then pleated them onto the brim, pinning until it looked right.


Once I liked the pleat arrangement, I stab stitched them down.  

Another view of the hat, ready to be trimmed and decorated

Because I am crazy, I decided it was a good idea to make my own ruching out of a bias strip, left over from making piping for the gown.  

Once the pleats were secure on the ruching, I tacked each down and sewed a pearl bead in the center, to create these little bows. 

This took so much time, but it was worth it!  I was panicking because these steps were on Thursday, and my show opened Saturday morning.  I fitted the band over the hat, tacked it down in 4 places, added a huge antique button, and stuck some feathers in.  Voila!  


Sunday, June 7, 2015

Slow Progress

The good news is, I've been commissioned for some work at a well-acclaimed local theatre!  Yay!  The bad news is, this means I haven't been able to work very much on my Elizabethan gown.   I'm super excited about my work at the theatre, because I'm learning some new skills and have two exciting historical tailoring projects;  a 1927 ladies' wool plaid suit, which I completed last week, and a 1810 yellow 'Spencer' cropped jacket and matching dress, which I'm working on now.  Although I won't post pictures of my commissioned work here, you will eventually be able to see these projects in my official portfolio at samanthareckford.carbonmade.com.

Although work was slow these past few weeks, it didn't stop completely!  

First things first, I drafted a pattern for the gown bodice, and had a sitting over my corset.  The tricky thing here is that my mannequin doesn't wear the corset very well (lack of squishy bosom) so I need to fit it on myself, which isn't the most convenient.  Once my sister gets home from college, I am going to force her to be a fit model, as she is almost my same size.  


Once I corrected the bodice pattern, I cut if from both a nice dense cotton twill and the dyed blue fashion fabric.  I sewed boning channels into the twill, and cut the steel bones to match.  I hadn't planned for the bodice to be supportive without a corset, just nice and smooth, but it's turning out pretty hefty.  Hooray?  

My fabric is big and my table is small!  To cut out the skirt piece, I rolled it Torah-style onto two tubes.  This fabric continues to be confounding, looking completely different under diverse lighting conditions. 

Sewing a strip of baby flannel onto the top edge of the skirt, to support the cartridge pleats.


I sewed my gold trim onto the bodice pieces before flat-lining them to the twill, so that the stitches would be sandwiched between the layers.  I also wanted to get the trim on early so that it could finish nicely into the cording and I don't have to worry about fraying.

Once everything was trimmed and lined, I sewed my seams together and drafted some straps, which will mostly be covered by my sleeve puffs.  

The bodice back, with cording in the seams.  This is more theatrical than historical, but Lord have mercy, I love how it looks.  

This... almost looks like a garment?  Needs more piping.  I'm pausing on the bodice to get the skirt going, because I want to fit them together before finishing any hems.  


Monday, May 11, 2015

My Spanish Farthingale, Myself

With the help of the internet, I set out last week to construct my second piece of shape wear: a Spanish Farthingale.   I found it difficult to discern proper dimensions because of 1. the dearth of full length paintings of women during this period (circa 1558) and 2. the fact that I am approximately a full 8 inches taller than the average Elizabethan woman.  The practicalities of modern theatre also took their toll: at 5'10" there is a good chance that I'll be the tallest women in a given scene (I often tower over men, too) and I don't want my already large presence + voluminous skirt to completely over-power any tableau that I join.  So my goal was be as historically accurate as possible while maintaining proper proportions and trying not to overwhelm everything around me.  Here we go!

During my design process, I've been been taking inspiration from this portrait of Bess by Steven Van Der Meulen.  Called the "Hampden Portrait," it is thought to be the first full-length portrait of the Queen, painted in 1563.  This is just the period I'm looking to re-create, so it's a great resource.

My trim placement and partlet design are also influenced by this painting

What we've got here is an exaggerated trumpet shape, which (unlike most iterations of the Spanish Farthingale) appears to be flared at the bottom.  Liz is also probably wearing a modest bum-roll to get that almost horizontal lift of the skirts around her waist.   I suspect that the flare shape is not actually from her support garments, but from the heavy weight of her voluminous skirts doing an elegant sweep- farthingales at the time seemed to end several inches above the ground so that the wearer could walk comfortably, and the Queen's skirt is widest right where it hits the floor.

To begin, I checked out these instructions from the Elizabethan Costuming Page: http://www.elizabethancostume.net/farthingale/period.html.  Those are based on Juan Alcega's description of how to make a farthingale, which (rock star costume historian) Janet Arnold also studies in her book series.

 I didn't use any of the same measurements or finish my waistband the same way, but I took Alcega's example and began by creating a gored skirt, with four triangular gores attaching to rectangular front and back panels.   I picked a light-weight, faux silk Polyester Nightmare (tm) fabric from JoAnn's for my farthingale because I wanted it to be 1. lightweight and 2. slippery.  I've had problems before with petticoats 'catching' and sticking to my overskirts, so I wanted to make sure that my farthingale would be nice and slick and let the petticoat slide over it naturally.  So far, there hasn't been a downside to this fabric choice, but we'll have to wait and see how it holds up to wear!

I chose to finish my waistband with elastic, as opposed to the more common snaps or ties, because there will already be so many bulky things around my waist (petticoat, bum-roll, overskirt) and I didn't want any more strings or stiffened waistbands to get tangled in.  I wanted to make my boning channels from grosgrain ribbon, but the closest color match at Michael's was satin.  So satin it is, and I hope this won't come back to haunt me.


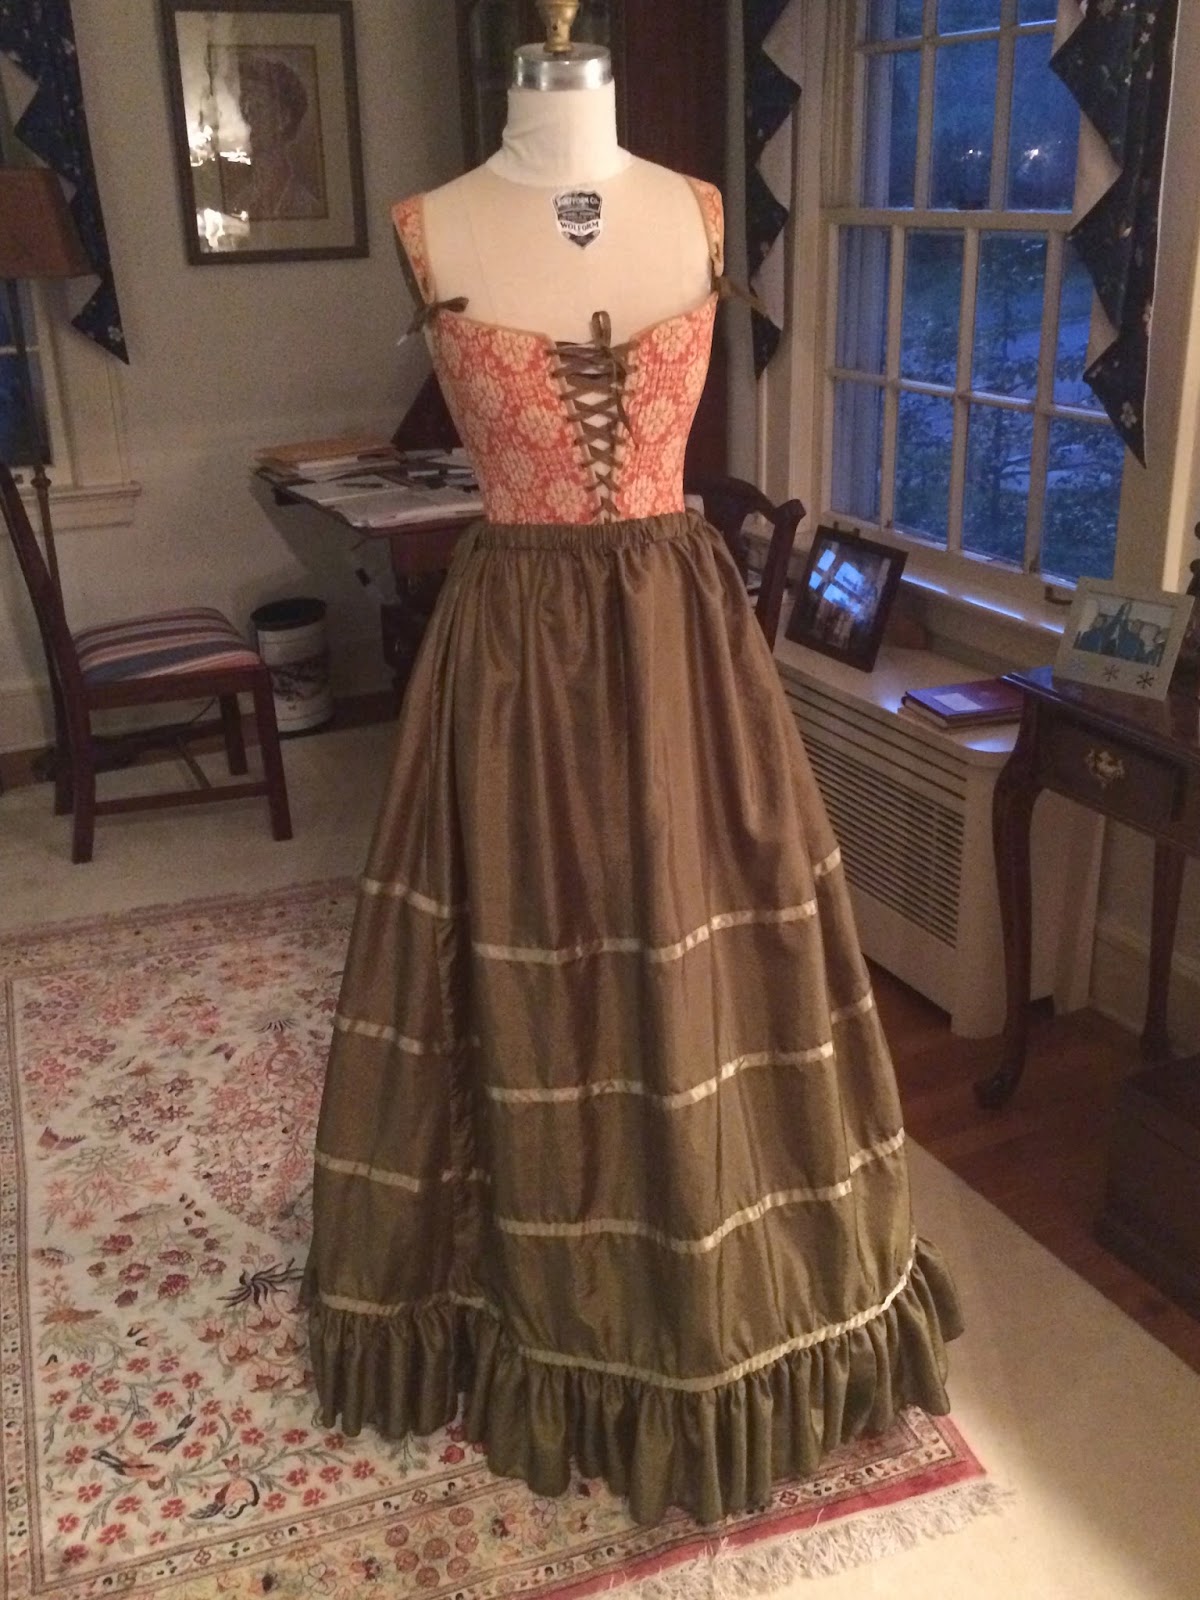
The gored skirt on my mannequin.  We were having family visit, so I dressed the form up to prove that I am actually up to something, not just making a huge mess.


I had extra fabric, so I decided to make a ruffle!  This took forever (36 yards, serged on both sides and gathered) but I am glad that I did it- I really gives the garment a more 'finished' look, and I hope the ruffle will keep the overskirts from collapsing too much below the lowest hoop.  My skirt is about 3.5 yards wide at the bottom.


Poly nightmare fabric is your friend.

My boning is from corsetmakingsupplies.com and came in a 12 yard roll, which was just enough for my 4 hoops.  I didn't cut it initially, because I wanted to experiment with the size of the bottom hoop.

    
The farthingale with one hoop, worn with my bum-roll and the moss silk petticoat.  It doesn't look quite right- I think I'll be slimming down the sides of the bum-roll.  I can also see the bone pushing against the petticoat and causing an ugly line, which is a big no-no. 

Well, here is that portrait-appropriate flare shape, but it looks like a mess.  Not quite there yet.


Progress!  Here is the skirt with two boning hoops in it:

The left side is sticking out way further than the right- the is solved by sliding the hoops through the boning channels until they lie more evenly.  Eventually, when I decide on a final shape, I'll tack each hoop in a few places to keep them from shifting.  I also chose to stagger where the boning channels open and the hoops connect: this is so that if the hoops are weaker at their connecting spots, the whole skirt won't buckle along one line and turn into an oval or an egg-shape.

The skirt with all the channels sewn, but no hoops inserted.  This thing is huge- I had fun wearing it around, pretending to know Flamenco dancing.

Four hoops! I'm leaving the channels open and unfinished for now- I want to be able to keep adjusting the size. 

Four hoops, with the petticoat on top.  I'm very happy with how the petticoat is falling at the hem- nice and elegant, not caving in or collapsing at all.  I'm not so sure about the shape, though- it's more like a 1860's bell than a 1560's cone, but not offensively different than the portrait.  I'll keep fiddling around.  

I'm glad that I chose to only use 4 hoops, instead of the more usual 5-7.  I can't see the channels at all under the petticoat (yes!) and it's hanging relatively naturally.

It must be the hoop skirt influencing me- while I worked on this, I began to think of my character as an Elizabethan Scarlett O'Hara.  Although I haven't been officially cast, my director mentioned that one possibility would be Lettice Knollys, the Queen's cousin.  Historically, she was a social climber with fairly loose morals who was very popular with the men.  I imagine Lettice as flirtatious, tenacious, prone to jealousy, and a fabulous dresser- just like Scarlett!  She liked to marry up and steal other people's boyfriends.  In the recent BBC mini-series "Elizabeth; The Virgin Queen" Lettice even tries on the Queen's gowns and jewelry when no one is looking.  A 16th century Mean Girl!


Thursday, March 26, 2015

The Blue Elizabethan Dress- Introduction

I began daydreaming about this project back in January, and knew that I wanted to do a 'French Gown' in they style of the later 1500s, in either light blue or blue-green (which was called "watchet" by Elizabethans).  The full ensemble is going to consist of the gown as well as a shift, pair of bodies (corset), bum roll, fathingale, petticoat, forepart, partlet, removable sleeves and a miniature hat.  This will be my second large scale, independent historical design and production project- I completed an ensemble in the Florentine style of the 1490's back in September,  2014.    
Photo of my design rendering

 Planning stage is done, including purchasing fabric, and I began drafting a corset pattern yesterday.  I've decided to create a version of the famous "Effigy Stays," made of corset coutil and silk taffeta, with additional back lacing so that the stays will fit despite potential future weight change.   Here is my schematic sketch, which may or not prove to be incredibly wrong (it's my first time drafting from scratch!)


And a sketch in my notebook of how I'd like the corset to look.  I am going to make my shift with wide sleeves so that the gown can be worn without over-sleeves on the hottest summer days.  I'd still like a square, low neckline so that the gown can be worn with a partlet (for everyday wear) and without (for fancy occasions, evening, etc.)